Language
In this Tutorial
ArcGIS Pro Add-In Tutorial
Searching, Ordering and Retrieving Airbus Optical Imagery
This step-by-step tutorial is designed to help you master the OneAtlas Add-in for ArcGIS Pro. Follow this guide to integrate high-resolution Airbus optical imagery directly into your ArcGIS Pro projects.
1. Download Add-in
The Add-in can be downloaded here.
2. Overview
The OneAtlas Add-in brings Airbus Optical imagery straight into ArcGIS Pro. From a single ribbon tab, you can draw or import an area of interest, search the Airbus catalog, preview and order imagery, track your orders, and retrieve your delivered products — all without leaving ArcGIS Pro.
The Add-in supports two kinds of OneAtlas contracts:
- Living Library — A subscription with a prepaid credit balance used to stream or download imagery on demand.
- Pay-Per-Order (PPO) — An à-la-carte contract where each order is quoted and invoiced individually, covering the full Pléiades Neo, Pléiades, and SPOT archive.
Note: Most screens look and work the same for both contract types. Where they differ, this guide calls it out explicitly.
3. Installing the Add-in
- Double-click the downloaded
.esriaddinfile, or open ArcGIS Pro and go to Project → Add-In Manager to install it manually. - Confirm the installation when prompted.
- Restart / open ArcGIS Pro. A new Airbus OneAtlas tab will appear in the ribbon.
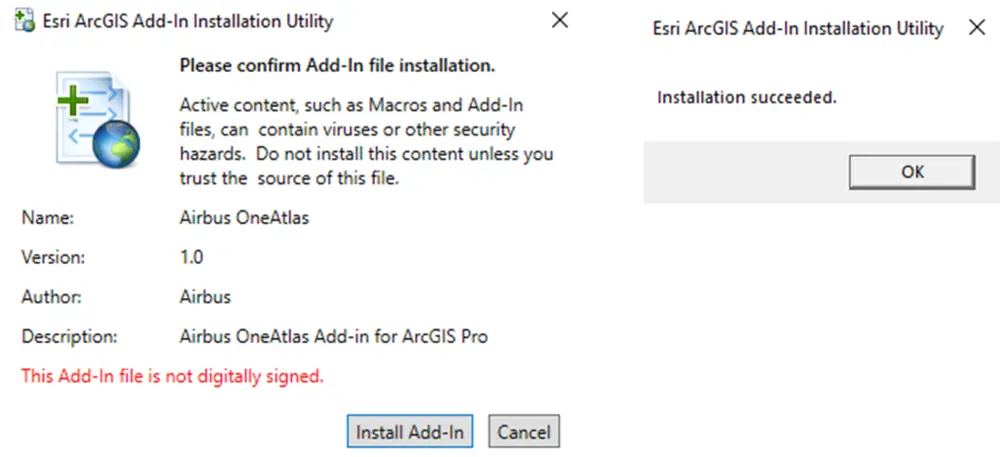
Figure 1 — Confirm the Add-In installation, then wait for the success message.
4. Signing In and Selecting Your Contract
To authenticate and access your account resources:
- Open the Airbus OneAtlas tab in the ribbon and click Log In.
- Authenticate with either your OneAtlas credentials or an API Key (handy for reusing a session without logging in again each time).
- Select your active contract from the Select a Contract dropdown, top-left of the ribbon.
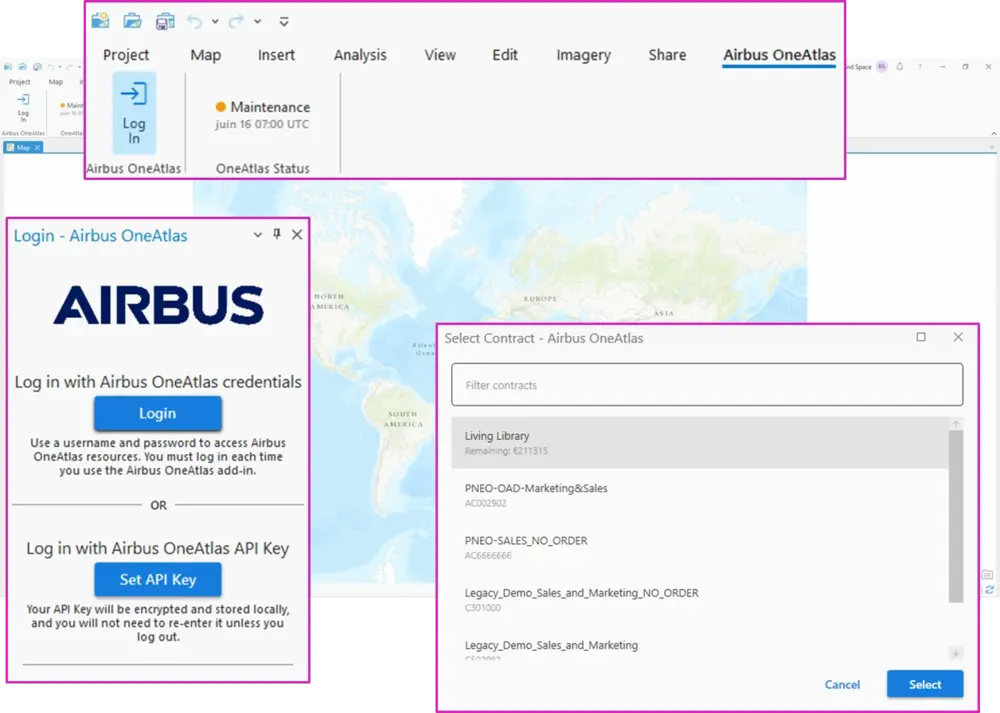
Figure 2 — Log In button, credentials/API Key panel, and the contract selector (Living Library, PPO contracts).
Once a contract is active, the ribbon shows its name and, for Living Library, your remaining credit balance (e.g., Living Library — Remaining: €211,315). For a PPO contract, the ribbon instead shows the contract reference.
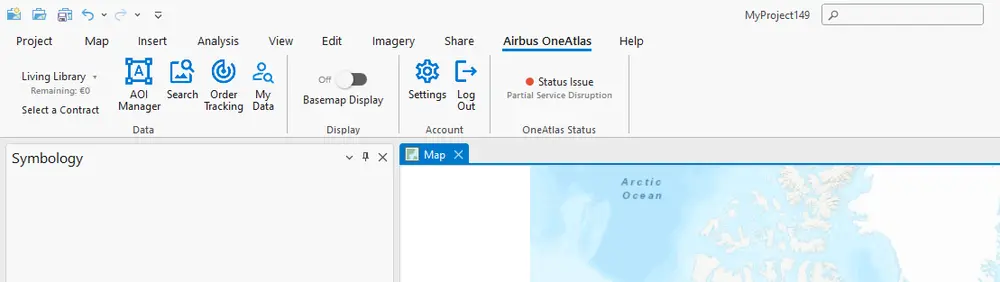
Figure 3 — The Airbus OneAtlas ribbon once logged in, with the AOI Manager, Search, Order Tracking and MyData buttons.
5. Define Your Area of Interest
Click AOI Manager to open the AOI pane. This is where you define the area over which you want to search for imagery.
- Draw AOI — Draw a polygon directly on the map.
- Import — Bring in an existing boundary from a Shapefile, GeoJSON, KML, KMZ, or CSV file.
Every AOI you create appears in the list with its surface area in km². Use the checkboxes to decide which AOIs are active for Search and MyData, the magnifier to zoom to one, and the red cross to delete it. Click a name to rename it.
Use Export to save your AOIs back out as GeoJSON, KML, Shapefile or CSV.
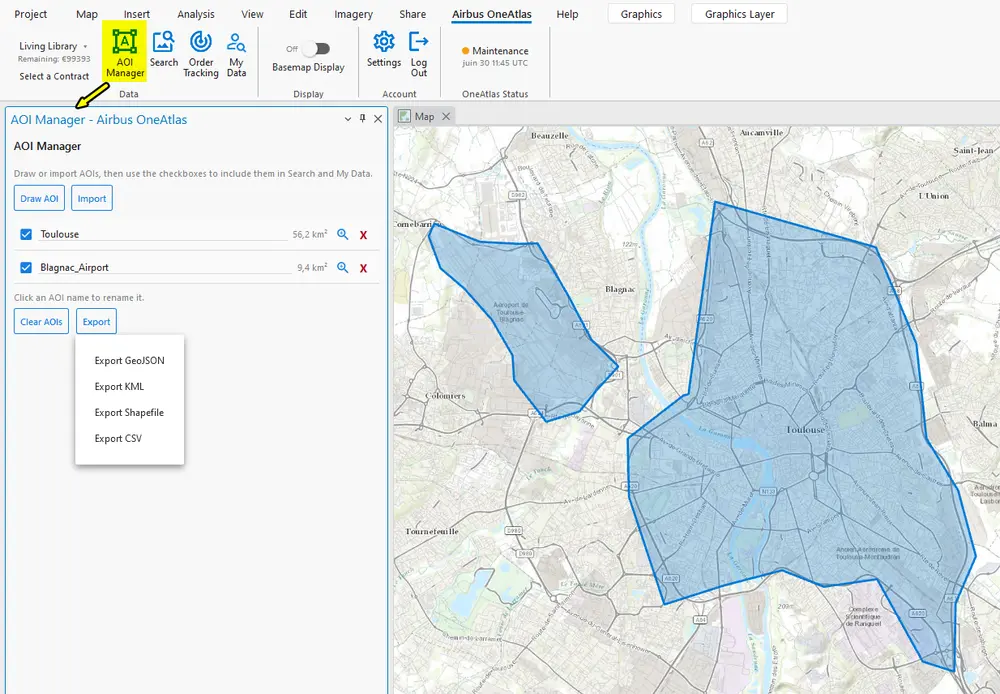
Figure 4 — AOI Manager with two active areas (Toulouse, Blagnac Airport) and the Export menu open.
6. Search the Archive
Click Search to open the Search pane. On the Search tab you choose your area (from the AOI Manager or from a map layer) and set your filters, then move to the Results tab to browse matching scenes.
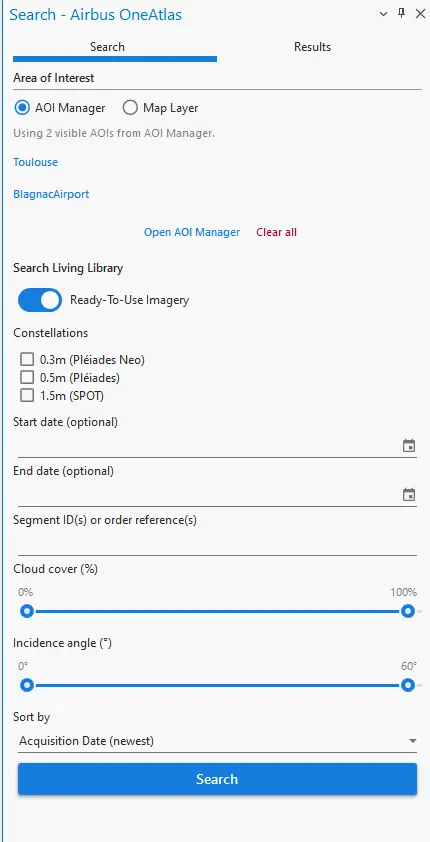
Figure 5 — Search tab: area of interest, constellations, and date range.
6.1 Ready-To-Use Imagery Toggle (Living Library Only)
This toggle controls which part of the Airbus catalog you are searching:
- ON — Searches the premium cache of recent, low cloud cover, low incidence angle scenes (imagery under ~18 months old). These are individual SENSOR products that stream instantly in ArcGIS Pro.
- OFF — Opens the full historical archive, consisting of ALBUM products that are not directly streamable. You get access to many more results, but ordered imagery needs to go through production and may take up to 48 hours to appear in MyData.
| Ready-To-Use ON | Ready-To-Use OFF |
|---|---|
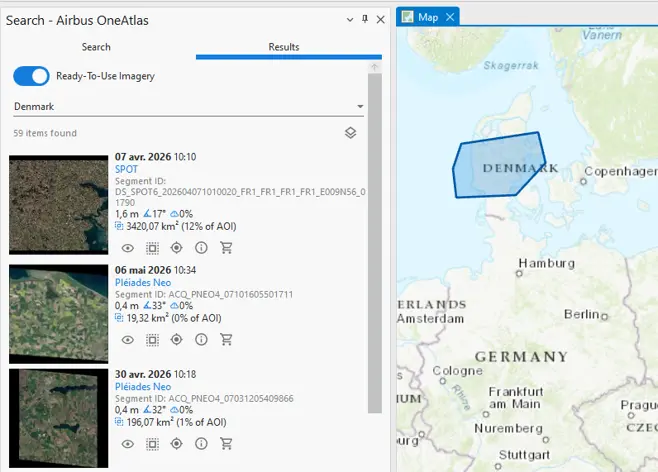 | 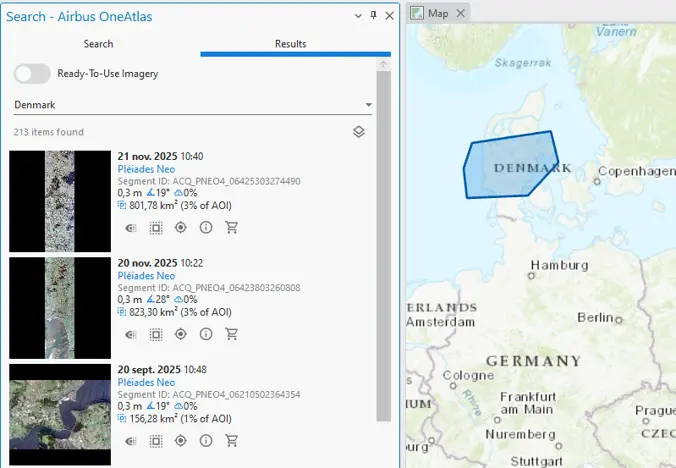 |
Figure 6 — Same AOI, same day: 59 streamable results with the toggle on vs. 213 results (including older/cloudier scenes) with it off. Living Library Only
6.2 Refining Your Search
Use the filters to narrow down your results:
- Constellation — Pléiades Neo (0.3 m), Pléiades (0.5 m), or SPOT (1.5 m).
- Acquisition date — Restrict to a specific start and end date range.
- Cloud cover — Filter scenes based on cloud cover percentage (0–100%).
- Incidence angle — Filter out very oblique acquisitions (typically set to 0°–60°).
- Segment ID(s) or Order Reference(s) — Look up a specific scene or search a past order.
Note (PPO / Archive contracts): The search panel also lets you filter by product type: Mono, Stereo, Tri-Stereo, or HD15-ready.
7. Explore Results on the Map
Each result in the list is a scene card with quick-action icons:
- Preview — Stream the image instantly (for Ready-To-Use / Living Library) or display a low-resolution quicklook preview (for the full archive).
- Footprint — Draw the scene’s exact boundary directly on the map.
- Zoom — Instantly zoom the map view to that scene.
- Info — View full acquisition metadata (date, resolution, incidence angle, cloud cover, and coverage relative to your AOI).
- Cart — Add the scene to your basket to order it (or to your Wish List on PPO contracts to batch several scenes into a single order).
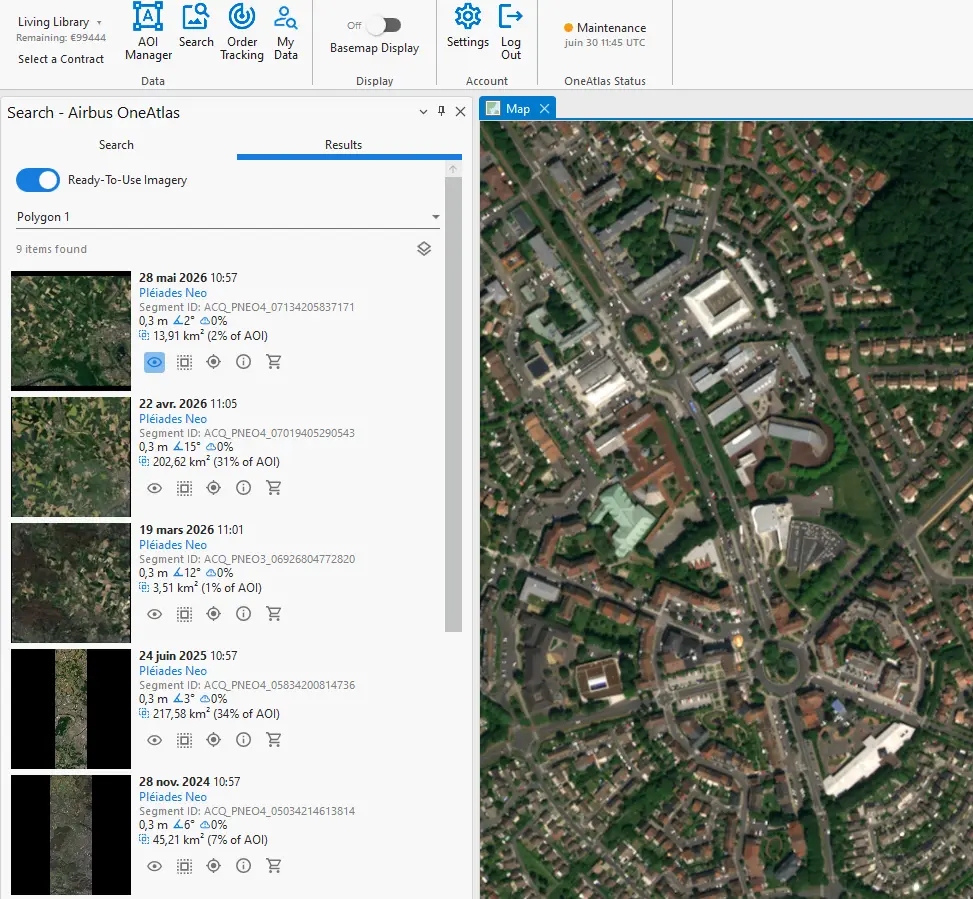
Figure 7 — A Pléiades Neo scene streamed at full resolution directly on the ArcGIS Pro map.
Tip: You can toggle the OneAtlas Basemap Display on/off at any time to switch between the default ESRI Map and the Airbus OneAtlas Basemap.
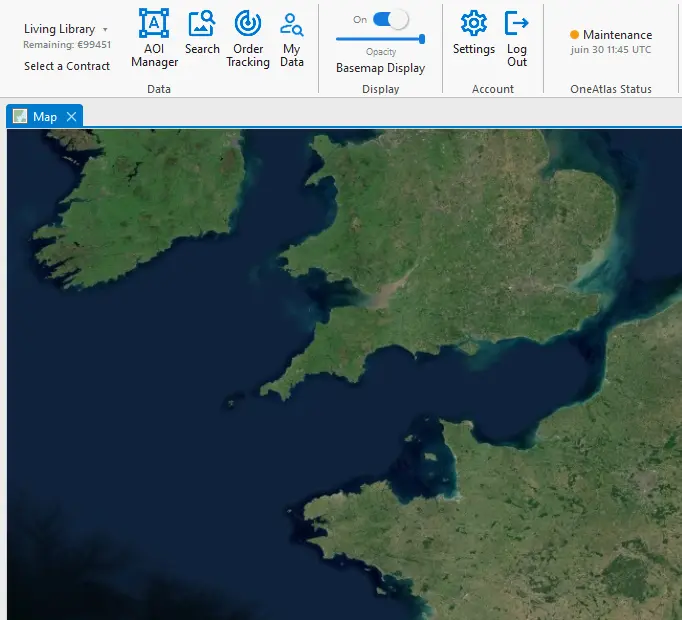
Figure 8 — OneAtlas Basemap Display switched on.
8. Order Your Imagery
Click the Cart icon on a result (or open your Wishlist on PPO contracts) to launch the order wizard.
Step 1 — Production Parameters
- Dehazing — Removes fog, smoke, and haze from the raster.
- HD15 — Applies super-resolution processing that renders Pléiades Neo imagery at an ultra-sharp 15 cm resolution (selecting HD15 automatically enables Dehazing).
- Sensor configuration — Choose whether the product is cropped to your AOI or delivered as a Full Strip.
- Radiometric & geometric options — Select band combinations, processing levels (e.g., Primary or Ortho), pixel coding, and image format (DIMAP, NITF, COG, JPEG2000, TIFF, etc.).
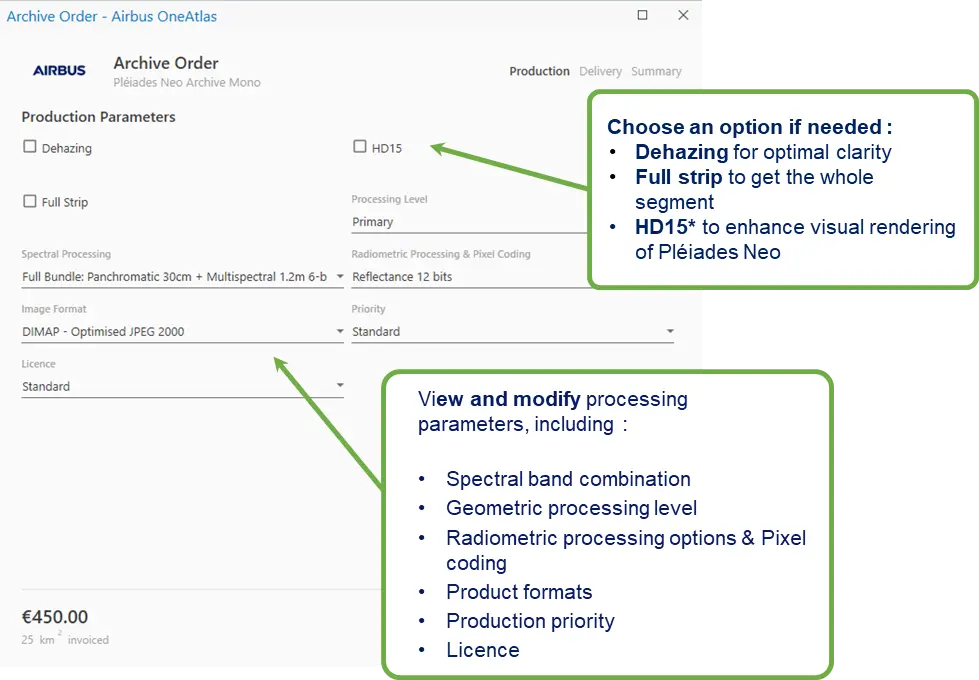
Figure 9 — Order wizard, Step 1 Production: choose optional processing and view/adjust the technical parameters.
Step 2 — Delivery Details
Name your project, choose the application field, and fill in end-user details (name, country) for compliance and tracking. You can add several email addresses to keep other stakeholders informed.
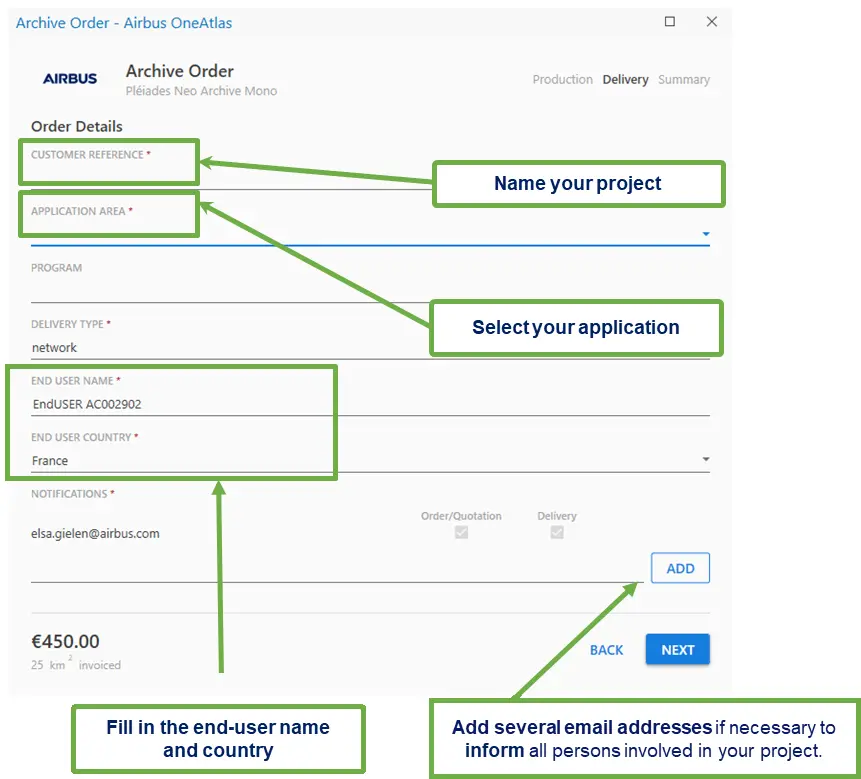
Figure 10 — Order wizard, Step 2 Delivery: project name, application, end-user information and notification emails.
Step 3 — Summary
Review the cost summary — request a quotation first if you need approval — then place the order. On a PPO contract, you can track pending quotations from Manage Quotes.
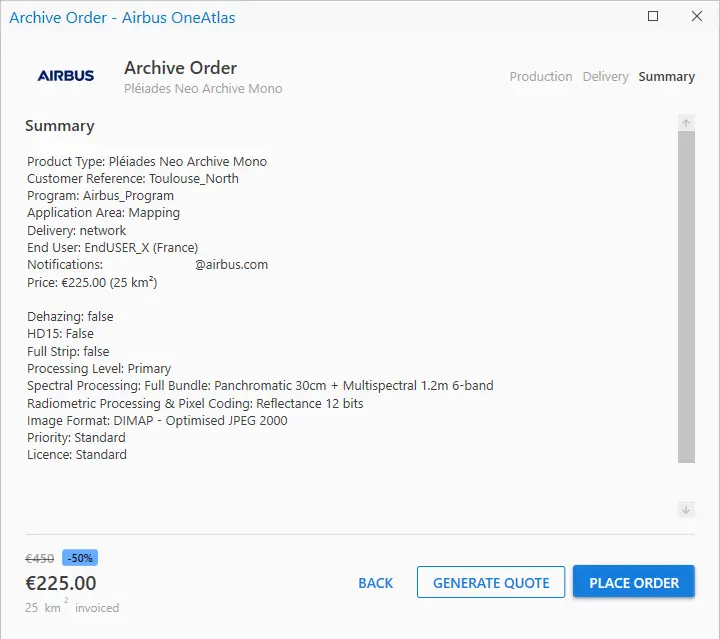
Figure 11 — Order wizard, Step 3 Summary: Request a quotation or Place the order.
9. Track Your Orders
Open Order Tracking to follow every order from submission to delivery. Filter by All, In Progress Completed or Error, or search by name/ID.
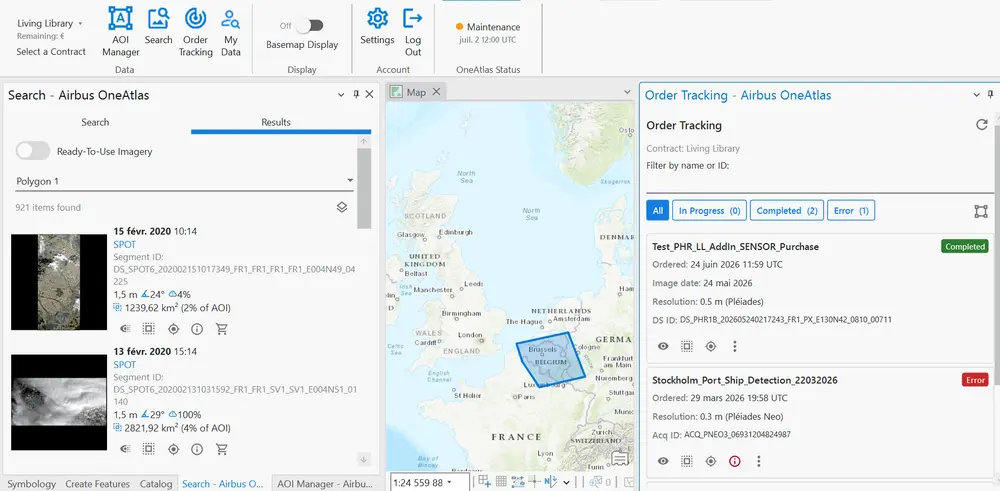
Figure 12 — Order Tracking list, Living Library contract.
Click an order to see its details: archive type, resolution, project reference, delivery status, and area invoiced. From there, Open in MyData takes you straight to the delivered product.
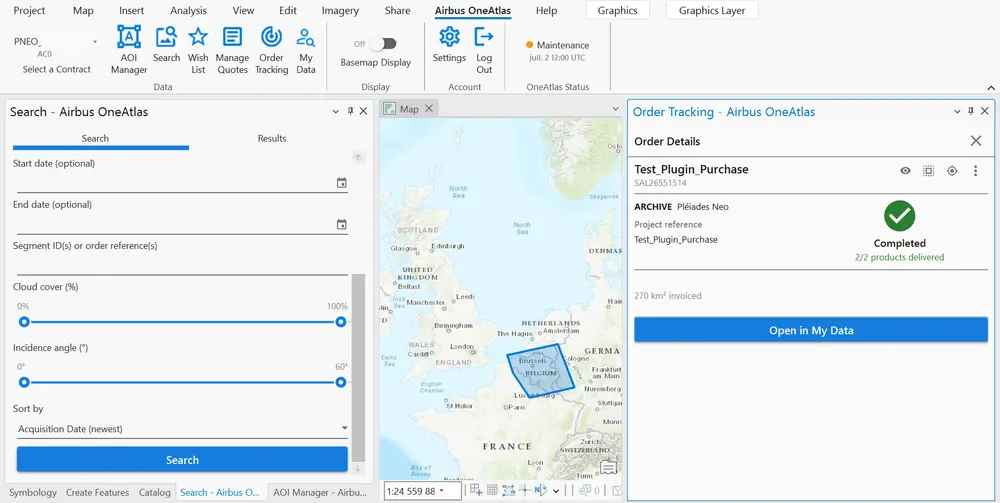
Figure 13 — Order detail panel, PPO / Pléiades Neo contract — order completed, 2/2 products delivered.
10. Access Your Data (MyData Workspace)
MyData is your private workspace where every delivered order is stored. Use the Filter tab to easily narrow down your results by resolution, publication date, area of interest, or ID.
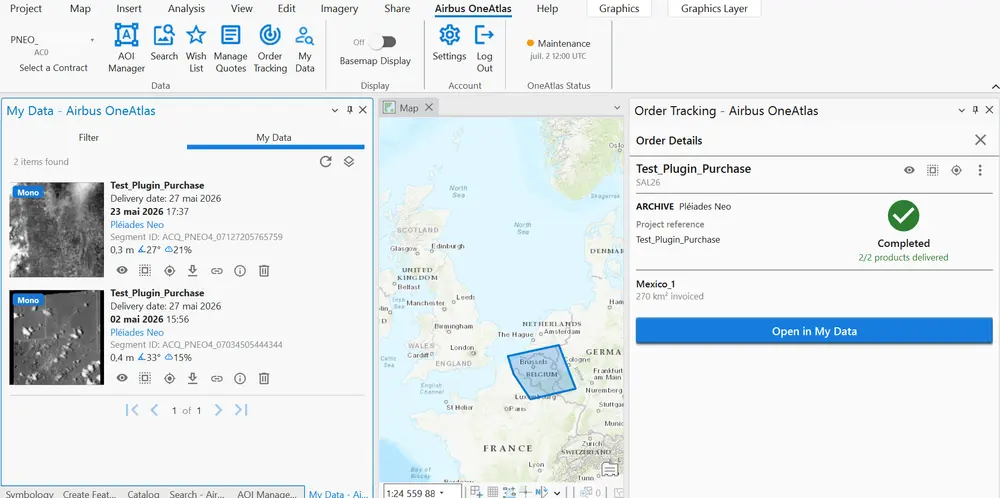
Figure 14 — ‘MyData’ workspace reached via “Open in My Data”, showing delivered scenes.
For each delivered product, you can perform the following actions:
- View — Preview the imagery, show its footprint, or zoom to it on the map.
- Download — Save the orthorectified product directly to your local GIS folders.
- Streaming link — Retrieve a WMS/WMTS URL to stream the asset in other web maps or third-party GIS projects.
- Info — Open detailed metadata including Sales Order, Customer Reference, radiometric parameters, and geometric parameters.
- Delete — Safely remove a delivered product from your workspace.
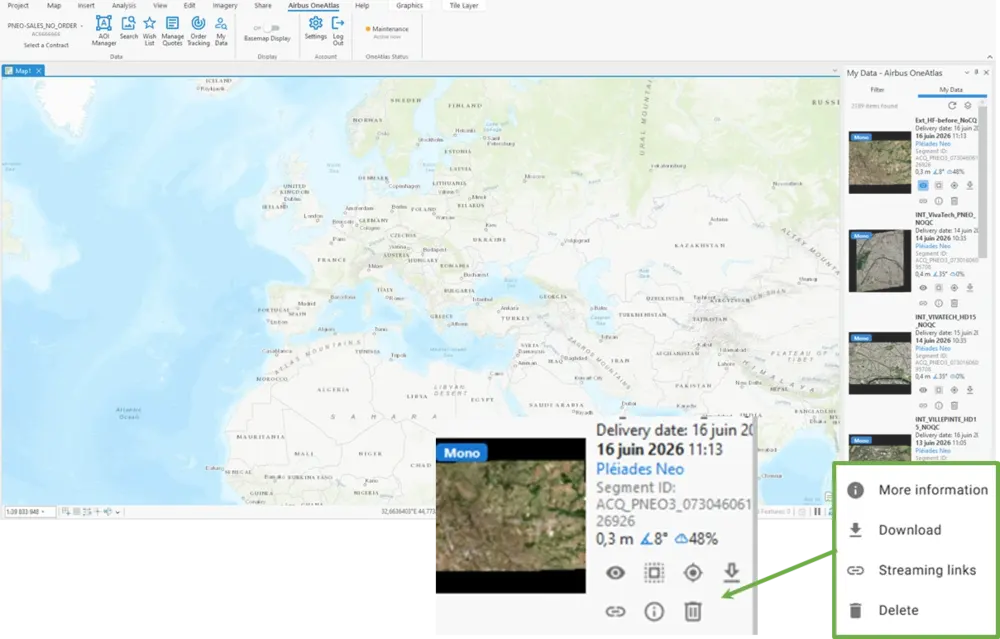
Figure 15 — Each item in MyData gives you these actions: Stream, Footprint, Zoom in, More information, Download, Streaming links, Delete.
11. Need Help?
For questions on the Add-in, your account, or an order, contact our developer support desk: intelligence-customertechnicalsupport@fr.airbus.com.
For advanced programmatic access beyond ArcGIS Pro, see the Airbus OneAtlas API documentation Living Library and PPO/Archive references.
© Airbus Defence and Space 2022. All rights reserved. Privacy Policy | Legal Information